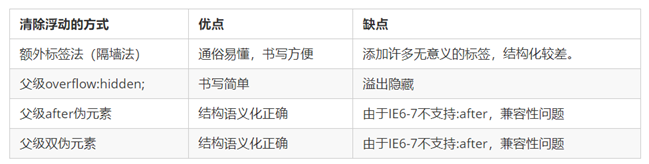
清除浮动的四种方式以及优缺点总结
作者:迹忆客
最近更新:2022/12/12
浏览次数:
我们先看一下浮动带来的影响
   <style>
        .outer {
            background: #000;
        }
        .outer .box1 {
            width: 100px;
            height: 100px;
            background: red;
            float: left;
        }

        .outer .box2 {
            width: 100px;
            height: 100px;
            background: green;
            float: left;
        }

        .bottom {
            width: 100%;
            height: 200px;
            background: yellow;
        }
 </style>
<body>
    <div class="outer">
        <div class="box1"></div>
        <div class="box2"></div>
    </div>
    <div class="bottom"></div>
</body>
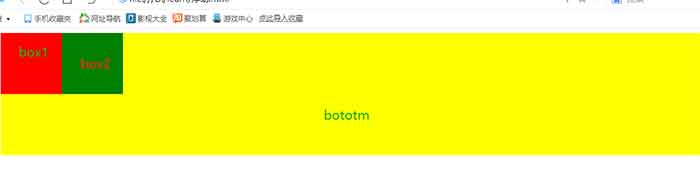
没有清除浮动之前,bottom盒子本来在outer盒子下面的,但是由于box1和box2浮动,导致父盒子outer高度为0,bottom盒子上去,为了解决这个问题,需要清除浮动。下面介绍清除浮动的四种方式以及每种方式的优缺点。
方式一:额外标签法
额外标签法就是在最后一个浮动的子元素后面添加
语法: 选择器{clear:属性值}
(属性值:left | right | both,实际工作中,几乎只用both)
在box2后面添加一个div设置clear:both;
代码如下:
    <style>
        .outer {
            background: #000;
        }

        .outer .box1 {
            width: 100px;
            height: 100px;
            background: red;
            float: left;
        }

        .outer .box2 {
            width: 100px;
            height: 100px;
            background: green;
            float: left;
        }

        .bottom {
            width: 100%;
            height: 200px;
            background: yellow;
        }
    </style>
<body>
    <div class="outer">
        <div class="box1"></div>
        <div class="box2"></div>
        <div class="clear"></div>
    </div>
    <div class="bottom"></div>

</body>
优点:通俗易懂,书写方便
缺点:添加许多无意义的标签,结构化较差
注意:要求添加这个新标签必须是块元素。
方法二:父元素添加overflow
方法:可以给父级添加 overflow 属性,将其属性值设置为 hidden、 auto 或 scroll 。
常用:overflow:hidden
代码:代码:
    <style>
        .outer {
            background: #000;
            overflow: hidden;
        }

        .outer .box1 {
            width: 100px;
            height: 100px;
            background: red;
            float: left;
        }

        .outer .box2 {
            width: 100px;
            height: 100px;
            background: green;
            float: left;
        }

        .bottom {
            width: 100%;
            height: 200px;
            background: yellow;
        }
    </style>

    <div class="outer">
        <div class="box1"></div>
        <div class="box2"></div>
    </div>
    <div class="bottom"></div>
优点:代码简洁
缺点:无法显示溢出的部分
方法三:after伪元素
.clearfix:after {
content: "";
display: block;
height: 0;
clear: both;
visibility: hidden;
 }
 .clearfix {  /* IE6、7 专有 */
         *zoom: 1;
 }
优点:没有增加标签,结构更简单
缺点:需要照顾低版本浏览器
代表:百度,淘宝网,网易等
方法四:双伪元素
.clearfix:before,.clearfix:after {
   content:"";
   display:table;
 }
 .clearfix:after {
   clear:both;
 }
 .clearfix {
    *zoom:1;
 }
总结:
相关文章
CSS 使用浮动居中元素
发布时间:2023/04/28 浏览次数:217 分类:CSS
-
本文主要讨论如何使用CSS实现浮动元素居中。 float 属性通常设置为左值或右值,而不是中心值。 本文将讨论浮动元素如何居中的几个技巧