Install and use Elasticsearch and MongoDB on Windows and Ubuntu
This article is a step-by-step installation and configuration guide for Elasticsearch on Windows and Ubuntu 20.04. It also demonstrates using Elasticsearch with MongoDB on both operating systems.
What is Elasticsearch
Elasticsearch is a NoSQL database, an open source real-time distributed and analytical engine designed to store logs. Elasticsearch is developed on Java programming and Apache Lucene.
Many well-known companies, including LinkedIn and OpenStack, use it. It supports full-text search based on documents rather than schemas and tables.
It is also used for data migration, indexing, and synchronization. Elasticsearch is the best choice when the application requires too many search operations and filters.
Installing Elasticsearch on Windows 10
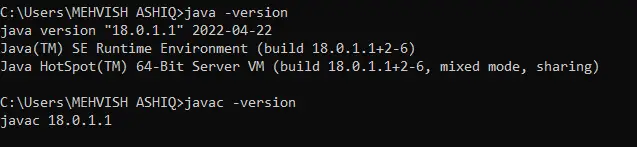
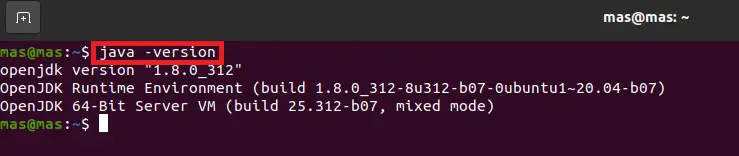
Step 1: Check if Java is installed
To install Elasticsearch on Windows 10, we must install the latest version of Java on our machine. You can also use any of the following commands to confirm that Java is already installed on your machine.
Remember that if we want to install Elasticsearch, we must have Java version 7 or higher.
Step 2: Download the Elasticsearch .zipfile
Go to this website and click on the download link in the following screenshot. Next, select the platform on which we want to use Elasticsearch and then download .zipthe file.

Step 3: Run the Elasticsearch batch file
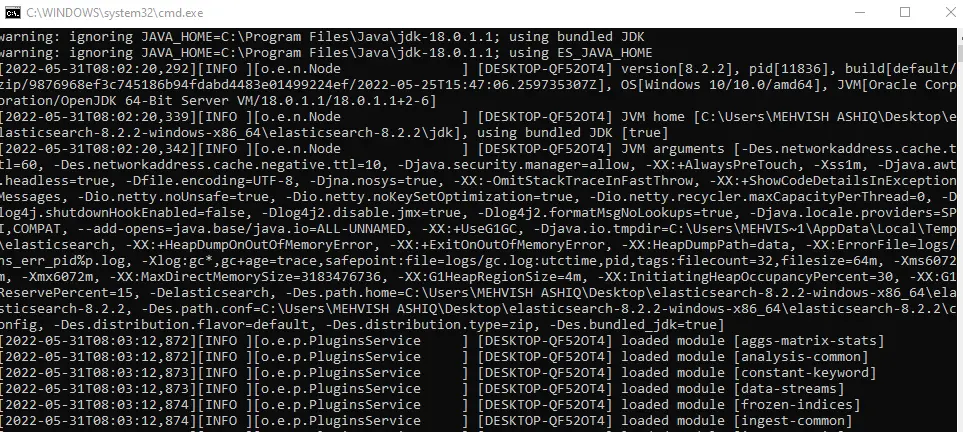
Once we have downloaded .zipthe file, extract it to your desired location. Then, navigate to binthe folder and double-click elasticsearchthe batch file.
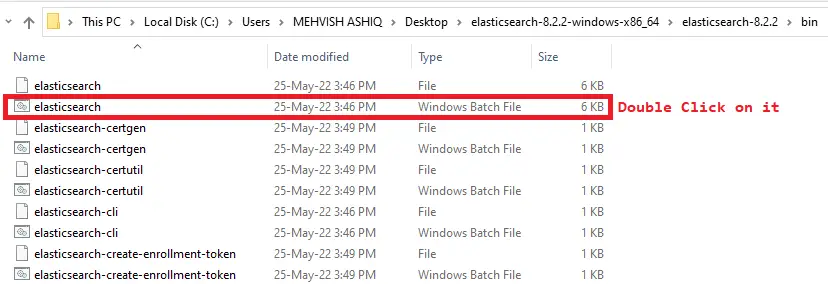
It is nothing but a standard Windows batch file which contains the steps that are executed behind the scenes. Also, it helps in starting the Elasticsearch daemon on your machine as shown below.
Keep it open and follow the steps below.
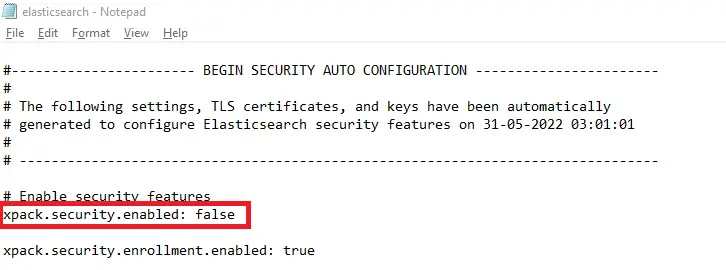
Step 4: Disable Authentication (for learning purposes only)
By default, authentication is enabled, which means we have to enter the login credentials. You can use the default login credentials or change them by following this page.
For this article, we will disable authentication (for learning purposes only, but recommended for production environments). We use Notepad to open the file which can be located at %ES_HOME%\config\elasticsearch.ymlthe path elasticsearch.yml.
Here, ES_HOMEis your Elasticsearch home directory. For example, in our case, elasticsearch.ymlit can be located at C:\Users\DelftStack\Desktop\elasticsearch-8.2.2-windows-x86_64\elasticsearch-8.2.2\config.
Once the file opens elasticsearch.yml, search for xpack.security.enabledthe option and set its value to false, as shown in the screenshot below.
Stop Elasticsearch and elasticsearch.batstart it again by running the ./opt/Elasticsearch.exe file.
Step 5: Run Elasticsearch on your browser
Type it on your favorite browser http://localhost:9200. If you see a page similar to the following screenshot, it means Elasticsearch is up and running successfully.

Install Elasticsearch on Ubuntu 20.04
Step 1: Install required dependencies
Update/upgrade package index:
sudo apt update
sudo apt upgrade
Like Windows operating systems, Java is also required on Ubuntu to install Elasticsearch. If it is not installed yet, execute the following command to install the default JDK on Ubuntu 20.04.
sudo apt install openjdk-8-jdk
Once installed, java -versioncheck if it exists using .
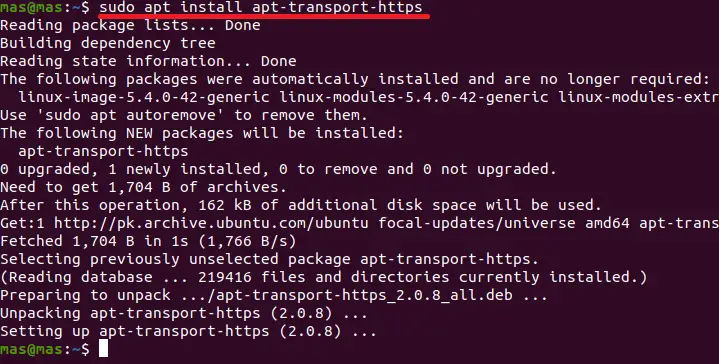
We also need to install a APT Transportpackage to HTTPSmake all our repositories accessible through .
sudo apt install apt-transport-https
Step 2: Download and install Elasticsearch on Ubuntu
The next task is to add the Elasticsearch repository. Use wgetthe query to extract the public key.
If everything goes well, you should get OKas output.
wget -qO - https://artifacts.elastic.co/GPG-KEY-elasticsearch | sudo apt-key add -

Now, add the repository to the system by executing the following command. We are writing in the following command 8.xas this is the latest version at the time of writing this tutorial.
echo "deb https://artifacts.elastic.co/packages/8.x/apt stable main" | sudo tee -a /etc/apt/sources.list.d/elastic-8.x.list
Again, update the package index using the command given below.
sudo apt update
Install Elasticsearch by executing the following command. The installation may take some time.
So, let it be done successfully.
sudo apt install elasticsearch

After installation, we must start Elasticsearch as it will not start on its own. If we reboot our machine, we will also need to re-run Elasticsearch.
To avoid this, execute the following command to automatically reload Elasticsearch after a system reboot.
sudo systemctl daemon-reload
sudo systemctl enable elasticsearch.service
sudo systemctl start elasticsearch.service
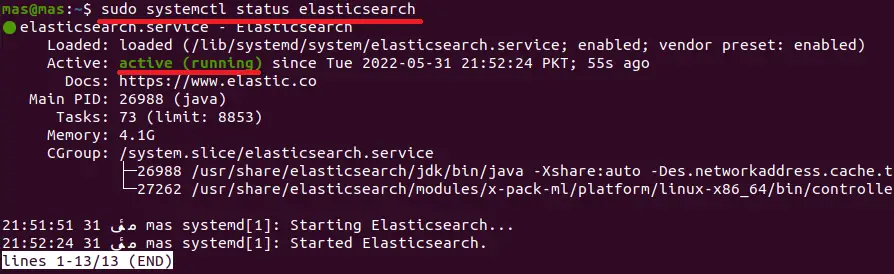
Now, check the status of Elasticsearch using the following command.
sudo systemctl status elasticsearch
Step 3: Configure Elasticsearch
By default, Elasticsearch is pre-configured for basic usage. If we want to use a single node in our setup, we don’t have to make any changes to the configuration file.
If you want to edit the Elasticsearch configuration, edit the file /etc/elasticsearchin the directory elasticsearch.yml. You can also /var/log/elasticsearch/logging.ymlfind the configuration for logging in .
We are editing elasticsearch.ymlthe ./configure_authentication.xml file to disable authentication for this tutorial. We are changing xpack.security.enabledthe value of from trueto false.
Remember, whenever you edit elasticsearch.ymlthe file, don't forget to restart the service using the following command.
sudo systemctl restart elasticsearch.service
Next, check that Elasticsearch is up and running using the following command.
curl localhost:9200
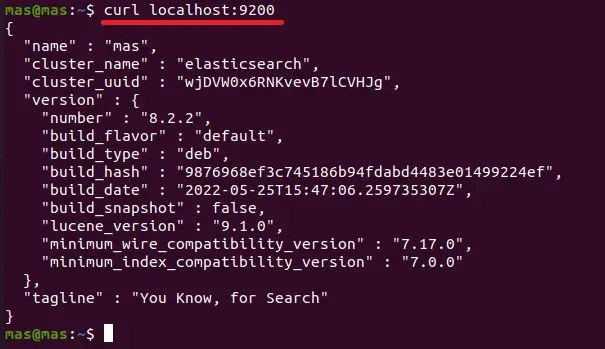
We can also type on the browser , it should show the same result http://localhost:9200as the command given above .curl

Top Reasons to Use Elasticsearch with MongoDB
We use MongoDB to store and query data, and Elasticsearch is used to full-text index the data. Therefore, the combination of the two (Elasticsearch for indexing and MongoDB for storage) is one of the common architectures followed by many companies.
Elasticsearch was developed for search purposes and it also provides advanced features for data indexing. It is used for data analysis along with Kibanaand Logstash.
One of the advantages of using Elasticsearch is that it can quickly search all fields in a specified document. We can think of it as having our own personal Google to search our data.
We can also use Elasticsearch in different scenarios. For example, we can perform synchronization, build search engines, data migration, indexing, and more.
In this tutorial, we will learn to use Elasticsearch with MongoDB for synchronization purposes.
Synchronizing with Elasticsearch
We have to follow the steps given below to perform synchronization using Elasticsearch and MongoDB on Windows/Ubuntu. Before that, make sure you have all the dependencies.
For example, we use in this code sample Node.js. In addition, continue to run two database engines (MongoDB and Elasticsearch).
After that, let's follow the steps.
Sample code (put the whole code in one file, we put it app.jsin the .
//Step 1:
const mongoose     = require('mongoose');
const mongoosastic = require('mongoosastic');

//Step 2:
mongoose.connect('mongodb://localhost:27017/studentdb');

//Step 3:
var StudentSchema = new mongoose.Schema({
      firstname: String,
      lastname: String,
      city: String
});

//Step 4:
StudentSchema.plugin(mongoosastic, {
    "host": "localhost",
     "port": 9200
});

//Step 5:
var Student = mongoose.model('student', StudentSchema);
  Student.createMapping((err, mapping) => {
    console.log('mapping created');
});

//Step 6:
var newStudent = new Student({
     firstname: 'Mehvish',
     lastname: 'Ashiq',
     city: 'Lahore'
});

newStudent.save((err) => {
     if(err) {
         console.log(err);
     }
     console.log('Student is added in both databases');
})

newStudent.on('es-indexed', (err, result) => {
    console.log('indexed to elastic search');
});
Now, run this code; it looks like this:

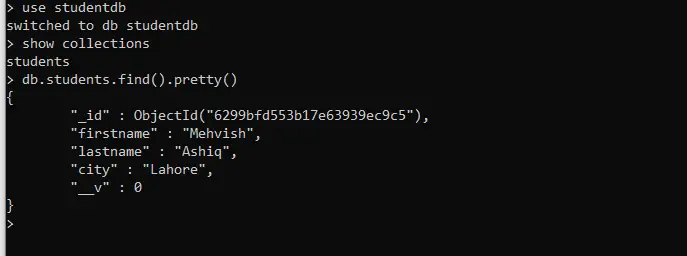
Confirm the entries in MongoDB as follows.
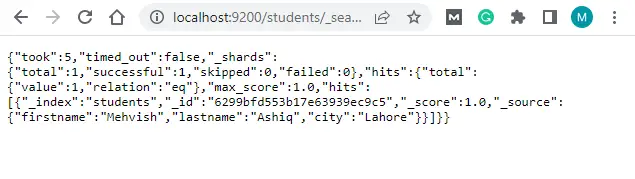
Next, open http://localhost:9200/students/_searchto confirm on Elasticsearch. It will look similar to the following screenshot.
For reprinting, please send an email to 1244347461@qq.com for approval. After obtaining the author's consent, kindly include the source as a link.
Related Articles
List all collections in MongoDB Shell
Publish Date:2025/04/29 Views:156 Category:MongoDB
-
When using MongoDB , there are several ways to list the collections in the database. This article will discuss four different ways to get a list of collections in a MongoDB database. These methods are as follows: show collections List all c
Querying for non-null values in MongoDB
Publish Date:2025/04/29 Views:139 Category:MongoDB
-
This MongoDB article will explain how to query for non-null values in MongoDB. To query for non-null values, you can use $ne the operator and $eq the operator and then specify the desired value to query. This article shows the readers
Shutting down with code:100 error in MongoDB
Publish Date:2025/04/29 Views:53 Category:MongoDB
-
This MongoDB tutorial will teach you to fix the error on different operating systems shutting down with code:100 . It will also talk about the root cause of why this issue occurs. shutting down with code:100 Errors in MongoDB As we all know
SELECT COUNT GROUP BY in MongoDB
Publish Date:2025/04/29 Views:74 Category:MongoDB
-
In this article, we will discuss the functions in MongoDB. Also, we will point out the aggregation functions in detail. We will explain in detail the different ways to count and sort multiple and single fields of Group in MongoDB. Operation
Differences between MongoDB and Mongoose
Publish Date:2025/04/29 Views:80 Category:MongoDB
-
This MongoDB article will discuss the differences between MongoDB and Mongoose. Unfortunately, most beginners tend to confuse these two concepts when they start developing applications and use MongoDB as their backend. MongoDB has its own s
Install MongoDB using Homebrew
Publish Date:2025/04/29 Views:161 Category:MongoDB
-
MongoDB is a well-known unstructured database management system that can handle large amounts of data. It is a document-oriented database system and belongs to the NoSQL family (non-SQL). Data and records are stored as documents that look a
Create a MongoDB dump of the database
Publish Date:2025/04/29 Views:62 Category:MongoDB
-
In this MongoDB article, you’ll get a walkthrough of Mongodump and Mongorestore , how to use them, and some simple examples of backing up and restoring your collections using both tools. mongodump Commands in MongoDB Mongodump is a tool t
Get the size of the database in MongoDB
Publish Date:2025/04/29 Views:88 Category:MongoDB
-
When working in MongoDB, do you know the size of your database? Today, we will learn how to get the size of a database in MongoDB using show dbs the command and the method. db.stats() Get the size of the database in MongoDB We can show dbs;
Grouping values by multiple fields with MongoDB
Publish Date:2025/04/29 Views:99 Category:MongoDB
-
MongoDB Group by Multiple Fields is used to group values by multiple fields using various methods. One of the most efficient ways to group various fields present in MongoDB documents is by using $group the operator, which helps in per